One image worth 1000 words!
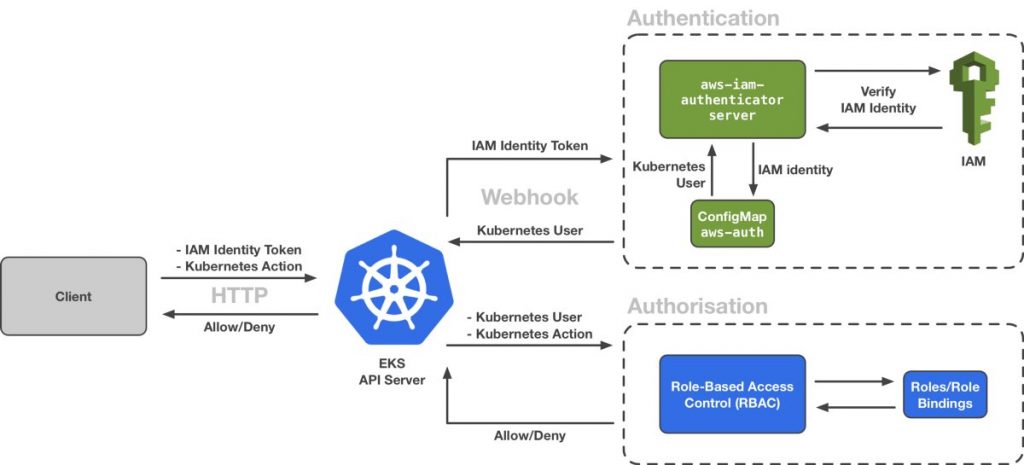
Read full article by Daniel Weibel on how authentication and authorization works on amazon EKS.
Read full article by Daniel Weibel on how authentication and authorization works on amazon EKS.
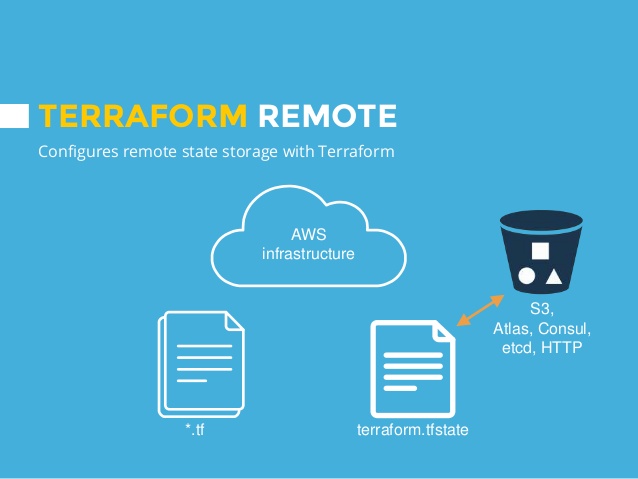
Terraform remote state and state locking is important part in team collaboration. What are challenges when working on Terraform in a team:
1. how to synchronize terraform state between people
2. how to avoid collisions of running terraform at the same time
Terraform remote state is a mechanism to share state file by hosting it on a shared resource like aws s3 bucket or consul server.
Example of storing state in s3 bucket.
terraform {
  backend "s3" {
    bucket         = "mybucket-terraform-state-file"
    key            = "example/terraform.tfstate"
    region         = "us-east-1"
    encrypt        = true
  }
}
Bucket have to be created beforehand. You the key to separate states from difference modules and projects.
Terraform locking state isolate state changes. As soon as lock is acquired by terraform plan or apply no other terraform plan/apply command will succeed until lock is released.
To store lock in dynamodb table you need:
– Create dynamodb table in your aws account in the same region as specified in your terramform backend configuration (us-east-1 in our case)
– primary key must have a name LockID without it locking will not work
terraform {
  backend "s3" {
    bucket         = "mybucket-terraform-state-file"
    key            = "example/terraform.tfstate"
    region         = "us-east-1"
    encrypt        = true
    dynamodb_table = "terraform_example_lock"
  }
}
Note that terraform provide a way to disable locking from command line using -lock=false flag, but it is not recommended.
One improvement is to set “key” keyword as variable and base it on module or project, so you don’t have to set it manually. One caveat with that approach is to make sure they key is unique across projects.
Best,
Iaroslav
Hey folks,
just a month ago I have been involved in AWS project based on Lambda functions. In this article I will explain what I learned so far and how to create production Lambda AWS environment with best practices in mind.
I will start from top level and will explain everything you need to have basic infrastructure supporting your Lambda functions and other applications in your cloud.
First, you need to created dedicated VPC and reserve range of IPs which doesn’t conflict with your other networks in case you would need to pair them together. As a general rule you should never use default VPC for production needs.
Create a security group which only allow 80 and 443 incoming traffic.
You would need at least 4 subnets, two private and two public. Each type of subnet have to split in at least two different availability zones.
Public subnet have to contain AWS services endpoints and your servers which needs to have direct connection to internet like ELB, API gateway endpoints or bastion host (your ssh jump server).
Private subnet have to contain all your infrastructure servers like web servers, database server or backend applications.
Note that You should never place your infrastructure servers in public subnets.
To function properly your VPC have to be attached to internet gateway and your private subnet should have NAT service enabled.
For the database I use MySQL RDS. You need to disable public access to the instance and deploy it into private subnet. In security group add port 3306 for incoming connections and only from internal IP range. So, we have double protection here with security group and internal dns name for database.
There are a lot of best practices of how to setup production ready mysql instance, so I will skip most of it, but what you definitely need is to have read replica and shadow copy enabled. Make sure you set maintenance window which is right for you.
To have access to our private database Lambda functions needs to be deployed inside the same VPC in private subnets. To setup https endpoints for lambda functions you would need to attach API gateway. In Lambda security groups add ports 80 and 443 for incoming connections.
That’s pretty much it, but very often you will have other web applications running in your vpc and to route traffic properly between Lambda and other apps you would need some web proxy like nginx.
To have common entry point for your web applications and Lambda function Nginx is the best way to go. There is a new possibility to use ELB for that, but it isn’t good enough yet.
To have reliable and secure setup of nginx you would need to use common pattern of AWS which include: ELB, Autoscaling group, Launch configuration and security groups.
On the configuration side nginx will proxy traffic to Lambda functions through API gateway.
Here you need to decide what kind of ELB suits your needs. I choose ELB with HTTPS support which provide SSL termination. In the ELB security group I added ports 80 and 443 for all incoming traffic.
Within Launch configuration you need to define what kind of instance you want to launch when autoscaling is trigger in.
ASG define what is desired number of instance you want to run at any given moment. Using metrics such as CPU you can setup it to scale up or down to desired maximum or minimum number of instances.
Last step is to connect ELB with ASG and with Launch configuration!
Note I have skipped setting up of Target group and health checks, but they are pretty much basics.
Now you have a good start to develop with AWS Lambda in conjunction with general approach of web tier architecture.
Second part of the topic is to setup CI and automation. Next time I will write how to code infrastructure with terraform, create nginx image with packer and run configuration management with ansible.
git clone https://github.com/ployst/docker-nginx-ssl-proxy.git
cd docker-nginx-ssl-proxy
./setup-certs.sh /path/to/certs/folder
Adding TLS files to Kubernetes secrets
cd /path/to/certs/folder
kubectl create secret generic ssl-key-secret --from-file=proxykey=proxykey --from-file=proxycert=proxycert --from-file=dhparam=dhparam
Kubernetes sidecar deployment
apiVersion: apps/v1beta2
kind: Deployment
metadata:
  name: nodejs-hello
  labels:
    app: nodejs
    proxy: nginx
spec:
  replicas: 1
  selector:
    matchLabels:
      app: nodejs-hello
  template:
    metadata:
      labels:
        app: nodejs-hello
    spec:
      containers:
      - name: nodejs-hello
        image: beh01der/web-service-dockerized-example
        ports:
        - containerPort: 3000
      - name: nginx
        image: ployst/nginx-ssl-proxy
        env:
        - name: SERVER_NAME
          value: "appname.example.com"
        - name: ENABLE_SSL
          value: "true"
        - name: TARGET_SERVICE
          value: "localhost:3000"
        volumeMounts:
          - name: ssl-keys
            readOnly: true
            mountPath: "/etc/secrets"
        ports:
        - containerPort: 80
          containerPort: 443
      volumes:
      - name: ssl-keys
        secret:
          secretName: ssl-key-secret
Save this file to deployment.yaml and create deployment Kubernetes object:
kubectl create -f deployment.yaml
Wait for pods to be Read:
kubectl get pods

NAME                            READY     STATUS    RESTARTS   AGE
nodejs-hello-686bbff8d7-42mcn   2/2       Running   0          1m
For testing I setup two port forwarding rules. First is for application port and second for nginx HTTPS port:
kubectl -n test port-forward <pod> 8043:443
#and in new terminal window run
kubectl -n test port-forward <pod> 8030:3000
First lets validate that application respond on http and doesn’t respond on https requests
#using http
curl -k -H "Host: appname.example.com" http://127.0.0.1:8030/
Hello World!
I am undefined!

#now using https
curl -k -H "Host: appname.example.com" https://127.0.0.1:8030/
curl: (35) Server aborted the SSL handshake
Note: SSL handshake issue is expected as our “legacy” application doesn’t support https and even if it would it must serve https connection on different port than http. The test goal was to demonstrate the response.
Time to test connection through sidecar nginx ssl proxy
curl -k  -H "Host: appname.example.com" https://127.0.0.1:8043/
Hello World!
I am undefined!
Great! We have got expected output through https connection.
My 2017 in pictures.


First time in UK, so unusual to hear English everywhere after 5 years in Germany 🙂
Hi guys,
this is day 18 out of 100 days of code.
To get md5 sum of a file you crypto/md5 library and io/ioutil for reading files.
package main

import (
	"crypto/md5"
	"fmt"
	"io/ioutil"
	"log"
	"os"
)

func main() {
	if len(os.Args) <= 1 {
		log.Fatal("expected filename as parameter")
	}
	filename := os.Args[1]

	data, err := ioutil.ReadFile(filename)
	if err != nil {
		log.Fatal(err)
	}
	fmt.Printf("MD5 (%s) = %x\n", filename, md5.Sum(data))
}
Thanks!
Hi guys,
this is day 17 out of 100 days of code in go lang.
Today I have played with files, sorting, bytes and strings. The goal was to create a kind of indexed file where all lines are arranged alphabetically.
What I got is very slow algorithm which took 15 seconds to insert 10K strings in an empty file and 49 seconds to insert another 10K strings to the same file. So, it slowdown very quickly as size grow.
func writeLineToFileSorted(newdata string) {
	indexData, err := ioutil.ReadFile("db.txt")
	if err != nil {
		log.Fatal(err)
	}
	var newIndexData []string
	for _, line := range bytes.Split(indexData, []byte("\n")) {
		//fmt.Printf("%s\n", line)
		newIndexData = append(newIndexData, string(line))
	}
	newIndexData = append(newIndexData, string(newdata))
	sort.Strings(newIndexData)

	bytesData := []byte(strings.Join(newIndexData, "\n"))
	ioutil.WriteFile("db.txt", bytesData, 0644)
}
I have to convert between strings and bytes which was kind of annoying, but maybe I am doing it wrong? Please let me know in comments.
If you want to load test it here is how:
func main() {
	rand.Seed(time.Now().UnixNano())
	var newdata string
	for i := 0; i < 10000; i++ {
		newdata = randStringRunes(10)
		writeLineToFileSorted(newdata)
		fmt.Println(i)
	}

}

var letterRunes = []rune("abcdefghijklmnopqrstuvwxyzABCDEFGHIJKLMNOPQRSTUVWXYZ")

func randStringRunes(n int) string {
	b := make([]rune, n)
	for i := range b {
		b[i] = letterRunes[rand.Intn(len(letterRunes))]
	}
	return string(b)
}
Source code at Github
Happy coding!
Hi guys,
this is day 16 out of 100 days of code.
With help of http and ioutil packages file download and storage is quite easy task.
package main

import (
	"io/ioutil"
	"log"
	"net/http"
)

func main() {
	url := "https://picsum.photos/200/300/?random"

	resp, err := http.Get(url)
	if err != nil {
		log.Fatal(err)
	}
	defer resp.Body.Close()

	image, err := ioutil.ReadAll(resp.Body)
	if err != nil {
		log.Fatal(err)
	}
	err = ioutil.WriteFile("./myimage.gif", image, 0644)
	if err != nil {
		log.Fatal(err)
	}
}
In the example I am using Lorem Picsum service to get random image every run.
Happy coding!
Hi guys,
this is day 15 out of 100 days of go land coding.
I continue github subject and today it is github issue reader. Example demonstrate how API results which come in json format convert into struct type.
package main

import (
	"encoding/json"
	"flag"
	"fmt"
	"log"
	"net/http"
)

func main() {
	repo := flag.String("repo", "", "github owner/repo e.g. golang/go")
	id := flag.Int("id", -1, "issue id")
	flag.Parse()

	if *id == -1 || *repo == "" {
		log.Fatal("--repo and --id parameters must be provided")
	}
	issue, _ := read(*repo, *id)
	fmt.Print(issue.Title)
}

// IssueData - specify data fields for new github issue submission
type IssueData struct {
	Title string `json:"title"`
	Body  string `json:"body"`
}

func read(ownerRepo string, id int) (*IssueData, error) {
	apiURL := fmt.Sprintf("https://api.github.com/repos/%s/issues/%d", ownerRepo, id)
	resp, err := http.Get(apiURL)
	if err != nil {
		log.Fatal(err)
		return nil, err
	}
	defer resp.Body.Close()

	if resp.StatusCode != http.StatusOK {
		log.Fatal(err)
		return nil, err
	}

	var result *IssueData
	if err := json.NewDecoder(resp.Body).Decode(&result); err != nil {
		resp.Body.Close()
		return nil, err
	}

	return result, nil
}
Happy coding!
Hi guys,
today is day 14 out of 100 days of golang coding.
This time I was playing with github issues api and made small script which create new issues in given repository. However to use the code you would need to obtain github personal token key.
The interesting part was to make http post request with custom headers.
package main

import (
	"bytes"
	"encoding/json"
	"flag"
	"fmt"
	"io/ioutil"
	"log"
	"net/http"
)

func main() {
	token := flag.String("token", "", "github auth token")
	repo := flag.String("repo", "", "github owner/repo e.g. golang/go")
	title := flag.String("title", "", "title for new issue")
	body := flag.String("body", "", "body for new issue")
	flag.Parse()

	if *token == "" || *title == "" || *repo == "" {
		log.Fatal("--token, --repo and --title parameters must be provided")
	}
	create(*repo, *title, *body, *token)
}

// NewIssue - specify data fields for new github issue submission
type NewIssue struct {
	Title string `json:"title"`
	Body  string `json:"body"`
}

func create(ownerRepo, title, body, token string) {
	apiURL := "https://api.github.com/repos/" + ownerRepo + "/issues"
	//title is the only required field
	issueData := NewIssue{Title: title, Body: body}
	//make it json
	jsonData, _ := json.Marshal(issueData)
	//creating client to set custom headers for Authorization
	client := &http.Client{}
	req, _ := http.NewRequest("POST", apiURL, bytes.NewReader(jsonData))
	req.Header.Set("Authorization", "token "+token)
	resp, err := client.Do(req)
	if err != nil {
		log.Fatal(err)
	}
	defer resp.Body.Close()

	if resp.StatusCode != http.StatusCreated {
		fmt.Printf("Response code is is %d\n", resp.StatusCode)
		body, _ := ioutil.ReadAll(resp.Body)
		//print body as it may contain hints in case of errors
		fmt.Println(string(body))
		log.Fatal(err)
	}
}
Example usage is as follow:
go build github_issue.go
./github_issue --token="5daf49b235c41d53ba6fsfasdfasdfasfsad" --repo="vorozhko/go-tutor" --title="my new issue 3" --body="test"